Order these spring-planted bulbs NOW for shipping this spring.
All bulbs for spring 2026 are SOLD OUT.
Order for spring 2026 starting September!
when spring bulbs are back for sale.
|
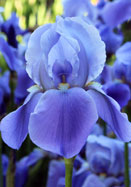
ENDURING PERENNIALS — Tough, beautiful, and diverse, heirloom iris thrive without care in old gardens and graveyards across America.
TO BLOOM THIS YEAR — Though iris are usually sold bare-root in summer and don’t bloom till the next, we ship freshly dug plants in April that, with good care and a bit of luck, may well bloom their first summer.
HISTORY & TIPS — Grown here since colonial days, iris became one of the “it” flowers of the Arts and Crafts era. They like full sun and well-drained soil. Learn more.
|
|
|
|
|
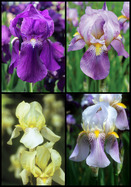
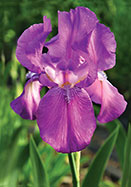
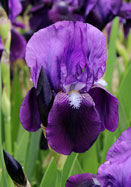
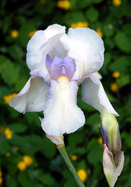
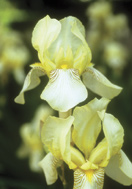
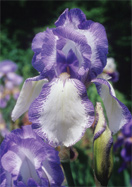
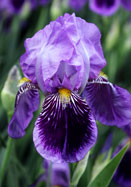
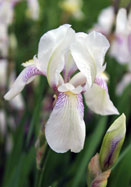
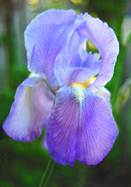
Icons of the late-spring/early-summer garden, bearded iris are easy to grow and richly diverse. Give them full sun and average to well-drained soil and they’ll reward you for close to forever. We’ll send you 3 of our favorite heirlooms (a few possibilities are pictured here), all different, labeled, freshly dug from our Ann Arbor micro-farm, and great for zones 3a-8a(10aWC).
For more of each variety, order additional samplers. Iris care. Spring shipped, click here for summer shipped.
|
|
|
|
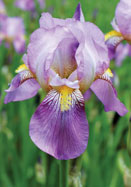
Born in Mapleton, Iowa, this handsome farmboy went on to win the iris world’s highest honors, including the Dykes Medal in 1950. A silvery blue-purple that’s usually described as “cornflower,” it looks especially good with silver-leaved perennials such as lavender and Russian sage. And it’s deliciously lemon scented! 38-40”, zones 3a-8a(10bWC), from Ann Arbor. Chart and care. Spring shipped, click here for summer shipped.
|
|
|
|
“‘I smell ripe grapes!’ cried a freckle-faced boy” in Ella McKinney’s 1927 Iris in the Little Garden – but it was actually this richly fragrant iris he smelled. It’s richly colored, too, a pure, deep, glowing rose that drew me like a beacon when I first saw it at our local Farmers Market many years ago. Just 24-26 inches tall, zones 3a-8a(10bWC), from our own micro-farm. Chart and care. Spring shipped, click here for summer shipped.
|
|
|
|
Short, early, and REBLOOMING, ‘Eleanor’ flowers at the very dawn of iris season and then again in the fall in warmer gardens. It’s an intensely deep reddish-purple with a fascinating iridescent sheen. Named for the First Lady who became one of the most admired people of the 20th century, this special iris deserves your vote! Just 20 inches tall, zones 3a-8a(10bWC), from our own micro-farm. Chart and care.
|
|
|
|
Considered the first American iris introduction, ‘Fairy’ is “by far the best” of the “tall, creamy, whites” (to quote AIS founder John Wister). “Delicately penciled and margined” with light blue/lilac and to add to its charms, ‘Fairy’ has a delicious, sweet scent, such that Ella Porter McKinney, author of Iris in the Little Garden, considered it “the one iris whose fragrance was liked by all.” It’s a fine legacy left us by the Illinois plant-lover and Civil War veteran Amasa Kennicott. Plicata, 40”, zones 3a-8a(10bWC), grown at our Ann Arbor farm and now finally increased enough to offer you! Chart and care. Spring shipped, click here for summer shipped.
|
|
|
|
Lauren Springer in Passionate Gardening tells of collecting a bit of this incredibly tough, moonlight yellow iris from “two shimmering clumps” at an abandoned homesite in Wyoming, way out in the middle of nowhere. “Perhaps someday,” she muses, “it will be all that remains of my house and garden.” (See a triumphant swath of it gone wild in Kansas.) Lemon fragrance, 30”, zones 3a-8a(10bWC), from our own micro-farm. Chart and care. Spring shipped, click here for summer shipped.
|
|
|
|
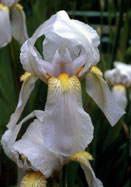
If I could grow only one iris, this might be it. Its color is a pale, luminous pewter – unique and ravishing. Its falls are long, like the ears of a basset hound. Its blooms kick off iris season. And its history is deep. Although modern scholars say it’s not the I. florentina or “white iris” of ancient times – now I. albicans – since at least the 1500s its rhizomes have been dried and sold as orris-root, a prized ingredient in herbal medicines and perfumery. Learn more here. Zones 3a-8a(10bWC), from our own micro-farm. Chart, care, and learn more. Spring shipped, click here for summer shipped.
|
|
|
|
This iconic flower could be called the original bearded iris. Fragrant and tough, it was grown in ancient Rome, carried east on the Silk Road, and by 1629 was so widely planted in England that Parkinson called it “the common purple flower-de-luce.” It’s also the iris immortalized by Van Gogh in his masterpiece Irises which sold in 1987 for a record-setting $54 million. 30-36”, zones 3a-8a(10bWC), from our own micro-farm. Chart and care. Spring shipped, click here for summer shipped.
|
|
|
|
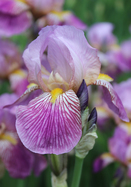
This pixie queen is an “exquisite shade of lilac-pink, almost old rose” (The Garden Magazine, 1917), but what really sets it apart is the rich tapestry of deeper rose that ornaments its falls. Plant it where you can enjoy that exquisite detailing up close, or pick lots of bouquets! Fragrant, 24-26”, zones 3a-8a(10bWC), from Ann Arbor. Chart and care. Spring shipped, click here for summer shipped.
|
|
|
|
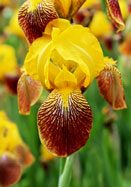
This tough little charmer, carried across the country by the pioneers, flourishes today in thousands of old gardens, cemeteries, and abandoned homesites from Bangor to Santa Barbara. Although our photo may make it look brassy or plain, in the garden here its small, cheery flowers of chestnut and gold have won it many fans. Some experts claim that, due to a mix-up 150 years ago, its real name is ‘Sans Souci’, but we’re unconvinced — and whatever you call it, this is a richly historic and rewarding iris. 20-24 inches, zones 3a-8a(10bWC), from our own micro-farm. Chart and care. Spring shipped, click here for summer shipped.
|
|
|
|
With velvety, wine-red falls and glowing standards of raspberry to bronze, this tall, striking, Jazz Age iris is one of the most colorful we grow. It’s exceptionally vigorous, too, thriving on neglect in old gardens everywhere and blooming even in part shade. By the good Dr. Wylie Ayres of Cincinnati, 32-36”, zones 3a-8a(10bWC), from our Ann Arbor micro-farm. Chart and care. Spring shipped, click here for summer shipped.
|
|
|
|
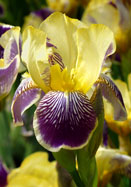
Named for the golden-haired siren of the Rhine, this quirky flower was one of the most popular iris of the early 20th century. Its glowing, primrose-to-amber standards are held in an open, goblet-like form, and they’re often splashed with bits of the richly veined violet of the falls – two “imperfections” that somehow only add to its enduring appeal. By Germany’s Goos and Koenemann, 22-26”, zones 3a-8a(10bWC), from our own micro-farm. Chart, care, and learn more. Spring shipped, click here for summer shipped.
|
|
|
|
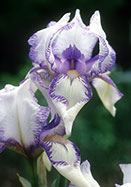
The most sought-after iris of the 19th century, ‘Mme. Chereau’ is tall, stately, and oh so lovely. Its elegantly long white petals are neatly stitched or feathered with purple along the edges in a pattern known as plicata. A truly landmark iris, it was bred by pioneering nurseryman Jean-Nicolas Lémon whose 150 dazzling introductions transformed iris from a wildflower into a garden superstar. Grape-scented, 36”, zones 3a-8a(10bWC), from Ann Arbor. Chart and care. Spring shipped, click here for summer shipped.
|
|
|
|
Introduced by Vilmorin-Andrieux et Cie, the famous French seed company, this sumptuous iris features violet standards over deep, velvety, claret purple falls with vivid white reticulations and an orange beard. But popularity and survival depend on more than good looks, and ‘Monsignor’ – like many cherished pass-along plants – grows with great vigor and blooms abundantly. Fragrant, 28-32”, zones 3a-8a(10bWC), from our Ann Arbor micro-farm. Chart and care. Spring shipped, click here for summer shipped.
|
|
|
|
The violet reticulations on this elegant, not-so-big iris make it even more beautiful up close – and great for bouquets. Named for the wife of one of Darwin’s sons, it’s an enduring survivor by Sir Michael Foster “whose name shines more luminously than any other in the early history of garden iris” (Mahan, Classic Iris). Fragrant, 24-26”, zones 3a-8a(10bWC), from our own micro-farm. Chart, care, and learn more. Spring shipped, click here for summer shipped.
|
|
|
|
This is the iris of my childhood, and maybe yours – tall, pale lavender, tough as nails, with a Concord grape fragrance that, as Elizabeth Lawrence wrote, “fills the borders and drifts into the house.” In his monumental Herbal of 1597, Gerard called it “the great Floure de-luce of Dalmatia” and praised its tall stalks, “faire large floures,” and “exceedingly sweet” scent. Even its leaves are beautiful! Stately but down-home, it’s a quintessential iris – and somehow makes everything around it look better. (See it farmed in Italy for making perfumes and gin.) 36-38”, zones 3a-8a(10bWC), from our own micro-farm Chart, care, and learn more. Spring shipped, click here for summer shipped.
|
|
|
|
One of the first “pink” irises, this Victorian favorite isn’t really pink but a soft, luminous, rosy lavender that’s distinctly different from the many lavender-blues of iris season. It’s fragrant, free-flowering, and still – as Ella McKinney summed it up in her 1927 Iris in the Little Garden – “old, early, and good.” 28-32”, zones 3a-8a(10bWC), from Ann Arbor. Chart and care. Spring shipped, click here for summer shipped.
|
|
|
|
This grape-scented beauty was first pictured 400 years ago in the lavish Florilegium of Emmanuel Sweert, a Dutch artist and nurseryman who was head gardener for the Holy Roman Emperor Rudolf II. Although it’s often confused with ‘Madame Chereau’ (see them side-by-side here), its curled, pointed falls are distinct – and charming. As for its spelling, although Sweert’s name has two Es, and ‘Sweertii’ would be correct by modern rules, we’re sticking with the historic ‘Swerti’. 30-36”, zones 3a-8a(10aWC), from our own micro-farm. Chart and care. Spring shipped, click here for summer shipped.
|
|
|
|
One of the oldest American iris, petite ‘Wyomissing’ debuted in the very first catalog of Bertrand Farr, the visionary Pennsylvania nurseryman who sparked America’s love affair with iris in the early 1900s. It’s a dreamy, uniquely-colored iris with warm white standards blushed lavender-pink and richly patterned falls of a deeper, rosier lavender that blurs and fades into mist at the edges. 22-24”, zones 3a-8a(10bWC), from our Ann Arbor micro-farm. Chart and care. Spring shipped, click here for summer shipped.
|
|
IRIS HISTORY — Native from Europe to Nepal, bearded iris are one of the world’s oldest cultivated flowers. They were carved on the walls of Egyptian temples, grown by the monk Walafrid Strabo in the ninth century, and included in Gerard’s great Herbal of 1597.
Colonial gardeners grew a handful, but the real glory days for bearded iris began in the mid-1800s when breeders in France developed scores of exciting new varieties such as ‘Madame Chereau’. British and American enthusiasts soon joined in, and by the 1920s iris ranked as one of the top three perennials in American gardens.
HIPS, HIPS, HOORAY! We’ve been members of the terrific Historic Iris Preservation Society since its founding in 1988, and if you love heirloom flowers we think you’ll find it well worth joining.
|
IRIS ARCHIVES — For customer tips and raves, the stories behind the flowers, links and books, history, news, and more, see our Iris Newsletter Archives.
IRIS AS CUT FLOWERS — For tips for longer lasting bouquets, see our Bulbs as Cut Flowers page.
IRIS PLANTING AND CARE — Unlike most sources, we ship our iris as bare-root plants in the spring. (See an example here.) Plant them right away. They’re freshly dug the day we ship them, they can take light frost, and to bloom their first summer they must get growing again ASAP. If necessary, store in the fridge for 2-3 days or “heel in” briefly in moist sand or soil.
Iris like lots of sun. Give them half a day, at least, or more for increased bloom and better health. Good drainage is essential, too, so plant in sandy to average soil. Avoid or improve heavy (clay) soil or plant on a slope or in raised beds.
Space 10-18 inches apart. Iris grow/expand outward from the leaf end of the rhizome (bulb), so keep this in mind when arranging and planting them.
Don’t plant too deep! Leave the top of the rhizome exposed. Dig a hole, mound soil in the center, set plant on top, and spread roots down the sides of the mound. Fill in and firm soil, making sure that the top of the rhizome remains exposed (or barely covered in extremely hot climates). Water well.
Though iris are drought-tolerant and will rot in soil that’s too wet, they’ll need regular moisture the first few months after planting as they reestablish themselves. So water them, but not too much. Let your green thumb be your guide.
After flowering, cut bloom-stalks to the ground. Weed carefully to avoid damaging shallow feeder-roots. For best bloom and health, trim or remove dead or disfigured leaves (but not healthy green ones!), especially in late fall and early spring, so air can circulate freely and sunshine can warm the rhizomes.
After a few years of vigorous growth, your iris may get so crowded that their bloom and health begin to suffer. To thin or divide them, wait 4-8 weeks after bloom and then either open up the clump by removing the oldest rhizomes from the center, or dig it all, replant the best new rhizomes, and give away or destroy (don’t compost) the others.
Iris have relatively few pests or diseases that trouble them. You can get helpful advice on the most common ones — iris borer (which is a problem east of the Rockies only), leaf spot, and root rot — at the excellent Iris Garden website sponsored by the iris societies of New England.
|